OK you preset the carbs so they start from the same place. From memory they are something like 5 complete turns from fully in to fully out, so start at two and a half turns (or whatever) from one end or the other. Also if the car has been running reasonably well, count the turns when you wind them in/out as it's probably a good starting point when you reset them. Then adjust one flat at a time on each carb and retest.
Chris
'NNN' and the overheat saga
Moderators: ClaytonSpeed, balmy
-
MarinaCoupe

- Posts: 10195
- Joined: Thu May 31, 2007 5:26 pm
- Location: Bedford
- Contact:
-
mickthefitter
- Posts: 1457
- Joined: Thu May 26, 2016 11:00 pm
Re: 'NNN' and the overheat saga
A very logical approach. Thanks Chris. I'm just really cagey about fiddling with things I'm not used to, and risking ending up worse off!
-
david painter
- Posts: 1706
- Joined: Sat Nov 24, 2012 3:52 pm
Re: 'NNN' and the overheat saga
Remove carb dashpots then wind jet up so It is level with the bridge. ( high part where jet is) Then wind each jet down 2 turns /12 flats, refit dashpots and top up with oil. Now slacken off connecting rod between throttles and then wind off each idle screw until just not touching the butterfly lever then wind each screw back in 1 1/2 turns. Now balance air flow using carb balancer using idle screws. when equal wind both idle screws equally to get steady 8/900 rpm idle. Now on to mixtures wind each screw up and down until smoothest idle speed is obtained, if both needles and jets are worn the same this will be equal amounts on both jets.Lift each dashpot slightly using giggle pin, so idle speed just rises slightly as pin is lifted and mixtures will be correct. This can then be checked using your colour tune and swapping it between cylinders. Tighten connecting rod between carbs and reset idle speed.
Dave
Dave
-
MarinaCoupe
- Posts: 10195
- Joined: Thu May 31, 2007 5:26 pm
- Location: Bedford
- Contact:
Re: 'NNN' and the overheat saga
Much better description David thank you.
Sent from my iPhone using Tapatalk
Sent from my iPhone using Tapatalk
-
mickthefitter
- Posts: 1457
- Joined: Thu May 26, 2016 11:00 pm
Re: 'NNN' and the overheat saga
Okay thank you. Sounds more complicated now, but I think I can manage itdavid painter wrote:Remove carb dashpots then wind jet up so It is level with the bridge. ( high part where jet is) Then wind each jet down 2 turns /12 flats, refit dashpots and top up with oil. Now slacken off connecting rod between throttles and then wind off each idle screw until just not touching the butterfly lever then wind each screw back in 1 1/2 turns. Now balance air flow using carb balancer using idle screws. when equal wind both idle screws equally to get steady 8/900 rpm idle. Now on to mixtures wind each screw up and down until smoothest idle speed is obtained, if both needles and jets are worn the same this will be equal amounts on both jets.Lift each dashpot slightly using giggle pin, so idle speed just rises slightly as pin is lifted and mixtures will be correct. This can then be checked using your colour tune and swapping it between cylinders. Tighten connecting rod between carbs and reset idle speed.
Dave
-
mickthefitter
- Posts: 1457
- Joined: Thu May 26, 2016 11:00 pm
Re: 'NNN' and the overheat saga
This is another 'what have I done to my Marina today' type thing on my own thread. I've done quite a bit actually, although considering my prime objective was to re-fit the re-cored radiator, I'm sure it will come as no surprise to anyone, that the radiator remained on my kitchen worktop all day long! It wasn't for lack of intention that it didn't get done, but I wanted to look at some other things too, and in my head, it was easier to do some of those with various bits removed that were already off, and before water started being splashed about (I was going to do another mini-flush through).
So, the jobs I did were as follows -
Removed the Kenlowe fan (a no brainer) and restored the bottom rad mounts to how they should be.
Mangled the non-locking choke inner cable a few inches in from the knob, to induce some friction. Surely better than clothes pegs.
Determined whether on not the crank pulley timing mark was out at TDC using the pencil in cylinder no.1 method.
Set the tappets.
Gapped the plugs
Re-checked the points gap I'd previously set
Set the timing statically to 7 degrees BTDC using a multi-meter instead of a 12V bulb. I hope this didn't harm the condenser, but I have a multi-meter and I don't have a 12V bulb on a bit of wire.
Changed the fuel pump spacer for one with a narrower slot from a Mini to better protect the aftermarket pump lever from escaping.
Attempted to grease the front suspension, and prop shaft joint.
During the work, the following points were noted or discovered -
The plug gaps were too wide. It looked like they'd been put straight in out of the box.
Six tappets were a bit loose, and two a bit tight, but nothing wildly out that would make much difference.
I decided my crank pulley was okay regarding whether the notch was in the wrong place at TDC. A pencil in plug hole 1 is hardly micrometer accurate (I came close to snapping it as the piston pushed it up and sideways!) but best I could tell, and I'm reasonably good like that, the notch lined up with TDC.
So that's when I decided to double check my points gap (14 thou, spot on) and then set the pulley to 7 degrees BTDC and use my multi-meter connected to the low tension lead, to determine the moment the points opened. As recommended in the Autodata manual, I then turned the engine over two revolutions and checked again. It was about half a degree out, on those not very accurate pointers, so that was good enough for me. Obviously with no rad yet, I've not run it.
Greasing - I've always thought I need three arms to do that. And I mean when I worked on machines in factories. One to hold the nozzle on the grease nipple and line it up so the grease goes in, instead of out the side, one arm to hold the grease gun and one arm to pump the lever. And infinite patience to bleed the air locks out! I'm never quite sure how to tell when Marina uprights have been greased effectively. I keep going till I see something ooze out. Typically like my white Marina KRB 158P in the 80s, one top grease point on NNN was harder than the others. I eventually got a thin line of black grease oozing out, but that was a tough one. I only had a small hand pump grease gun in the 80s, and had to get the car up on ramps. Today I just did it lying down under the front with a proper grease gun (too late in the day to jack it up). Why is there only one grease point on the prop shaft when there are several UJs???
Now the silly stuff.
While finding my way around the carbs, familiarising myself for when I attempt to tune, I found the spring and circlip are missing from the piston lifting pin on the front carb - which means the piston can be raised much farther by hand, than the back carb that still has a spring on. I will look at Burlen to see if I can buy the spares. But in the meantime, will the lack of spring and circlip affect normal running?
Silly stuff number two. Very silly. Despite me being no heroic restorer, it gave me one of those "You've got to be kidding me! Who on Earth...?" moments of incredulity. When I released the choke cable at the carb linkage, so I could pull the inner cable through inside the car and put some kinks in it, the connecting rod went 'thunk' and dropped down to the stoppers under spring pressure. I didn't even twig at first. When I'd mangled my cable up with pliers (and I very nearly over-egged it) I'd marked the position with Tippex and put it back how it was before, in the cable clamp at the carbs. It was only when I was referring to the book, looking to see if it gave a specification for the gap between the adjusting screw and the cam when the choke was closed, that I read "There must be approximately 2mm of free play in the cable when the choke is off".
Huh? What?
What?  Uh-oh...
This is how it is now, but not how it was. It was fastened where the cable first kinks as it comes straight down.
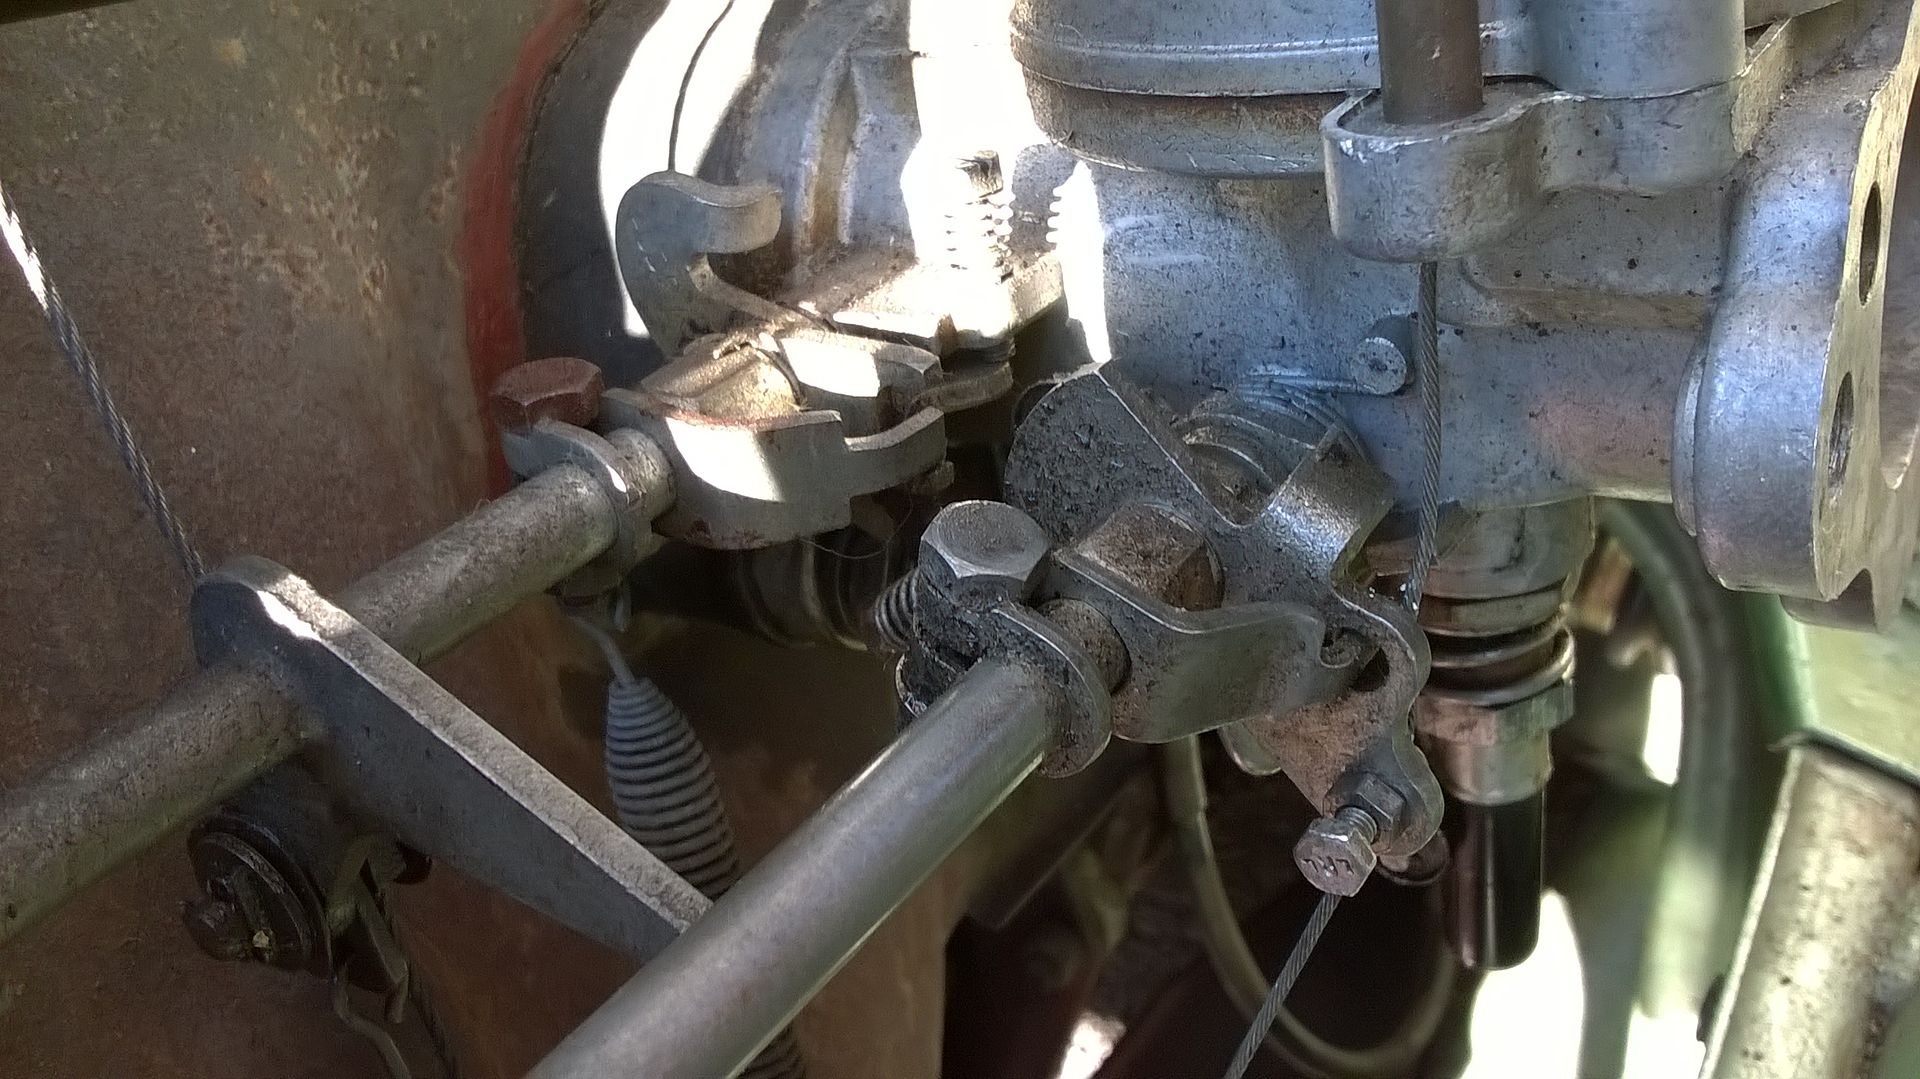
So hang on a minute...if my choke linkage was held off the stops by the cable, when it was pushed right in, that means I (and anyone else driving NNN before I got it) would be driving around with the choke butterfly partly closed. No wonder the bloody thing won't tune up and perform! And my next problem will be - has the mixture been adjusted while it has been like this? Also worrying is a wiggly line drawn under the heading for the section 'Replacing the carburettor needle' in the Haynes manual. I've implied some numpties have been working on my car before I got it - I reckon somebody who doesn't even know what a carburettor is might have been having a go!
So, more fun tomorrow. My modern Volvo goes in for a service but I intend getting back to the radiator when I come back in their courtesy car.
I'm going to update the entry on fuel pump spacers in the Technical section, now that I've swapped my spacer over, with some photos I took, of the Marina 1.8 and Mini spacer blocks.
One last thing...
The mixture adjusting nut under the carbs...it's the thin uppermost one, right?
Why do these carbs have a spring pipe going to the float bowl? I'm sure my old Wolseley Hornet didn't have that on its HS2.
So, the jobs I did were as follows -
Removed the Kenlowe fan (a no brainer) and restored the bottom rad mounts to how they should be.
Mangled the non-locking choke inner cable a few inches in from the knob, to induce some friction. Surely better than clothes pegs.
Determined whether on not the crank pulley timing mark was out at TDC using the pencil in cylinder no.1 method.
Set the tappets.
Gapped the plugs
Re-checked the points gap I'd previously set
Set the timing statically to 7 degrees BTDC using a multi-meter instead of a 12V bulb. I hope this didn't harm the condenser, but I have a multi-meter and I don't have a 12V bulb on a bit of wire.
Changed the fuel pump spacer for one with a narrower slot from a Mini to better protect the aftermarket pump lever from escaping.
Attempted to grease the front suspension, and prop shaft joint.
During the work, the following points were noted or discovered -
The plug gaps were too wide. It looked like they'd been put straight in out of the box.
Six tappets were a bit loose, and two a bit tight, but nothing wildly out that would make much difference.
I decided my crank pulley was okay regarding whether the notch was in the wrong place at TDC. A pencil in plug hole 1 is hardly micrometer accurate (I came close to snapping it as the piston pushed it up and sideways!) but best I could tell, and I'm reasonably good like that, the notch lined up with TDC.
So that's when I decided to double check my points gap (14 thou, spot on) and then set the pulley to 7 degrees BTDC and use my multi-meter connected to the low tension lead, to determine the moment the points opened. As recommended in the Autodata manual, I then turned the engine over two revolutions and checked again. It was about half a degree out, on those not very accurate pointers, so that was good enough for me. Obviously with no rad yet, I've not run it.
Greasing - I've always thought I need three arms to do that. And I mean when I worked on machines in factories. One to hold the nozzle on the grease nipple and line it up so the grease goes in, instead of out the side, one arm to hold the grease gun and one arm to pump the lever. And infinite patience to bleed the air locks out! I'm never quite sure how to tell when Marina uprights have been greased effectively. I keep going till I see something ooze out. Typically like my white Marina KRB 158P in the 80s, one top grease point on NNN was harder than the others. I eventually got a thin line of black grease oozing out, but that was a tough one. I only had a small hand pump grease gun in the 80s, and had to get the car up on ramps. Today I just did it lying down under the front with a proper grease gun (too late in the day to jack it up). Why is there only one grease point on the prop shaft when there are several UJs???
Now the silly stuff.
While finding my way around the carbs, familiarising myself for when I attempt to tune, I found the spring and circlip are missing from the piston lifting pin on the front carb - which means the piston can be raised much farther by hand, than the back carb that still has a spring on. I will look at Burlen to see if I can buy the spares. But in the meantime, will the lack of spring and circlip affect normal running?

Silly stuff number two. Very silly. Despite me being no heroic restorer, it gave me one of those "You've got to be kidding me! Who on Earth...?" moments of incredulity. When I released the choke cable at the carb linkage, so I could pull the inner cable through inside the car and put some kinks in it, the connecting rod went 'thunk' and dropped down to the stoppers under spring pressure. I didn't even twig at first. When I'd mangled my cable up with pliers (and I very nearly over-egged it) I'd marked the position with Tippex and put it back how it was before, in the cable clamp at the carbs. It was only when I was referring to the book, looking to see if it gave a specification for the gap between the adjusting screw and the cam when the choke was closed, that I read "There must be approximately 2mm of free play in the cable when the choke is off".
Huh?
This is how it is now, but not how it was. It was fastened where the cable first kinks as it comes straight down.

So hang on a minute...if my choke linkage was held off the stops by the cable, when it was pushed right in, that means I (and anyone else driving NNN before I got it) would be driving around with the choke butterfly partly closed. No wonder the bloody thing won't tune up and perform! And my next problem will be - has the mixture been adjusted while it has been like this? Also worrying is a wiggly line drawn under the heading for the section 'Replacing the carburettor needle' in the Haynes manual. I've implied some numpties have been working on my car before I got it - I reckon somebody who doesn't even know what a carburettor is might have been having a go!
So, more fun tomorrow. My modern Volvo goes in for a service but I intend getting back to the radiator when I come back in their courtesy car.
I'm going to update the entry on fuel pump spacers in the Technical section, now that I've swapped my spacer over, with some photos I took, of the Marina 1.8 and Mini spacer blocks.
One last thing...
The mixture adjusting nut under the carbs...it's the thin uppermost one, right?
Why do these carbs have a spring pipe going to the float bowl? I'm sure my old Wolseley Hornet didn't have that on its HS2.
-
david painter
- Posts: 1706
- Joined: Sat Nov 24, 2012 3:52 pm
Re: 'NNN' and the overheat saga
The thin top nut holds the jet sleeve in to level of bridge and allows a small amount of movement, to centralise jet when carb is built, the bottom nut is the mixture adjuster. All Jets should have the stainless steel sleeve, it forms two functions one is to stop plastic pipe kinking the other is to reduce heat transfer into the fuel inside the pipe. The missing giggle pin spring is of no real concern as it does nothing in normal running its just there for setting up. Im not keen on putting things down the bore but use the Vacuum Gauge method ( I posted a like to you tube video earlier in thread) I have used this method many times and find it to be super accurate.
Dave
Dave
-
mickthefitter
- Posts: 1457
- Joined: Thu May 26, 2016 11:00 pm
Re: 'NNN' and the overheat saga
Yes I watched the video Dave. I have a Gunsons vacuum gauge but that is all it is for, vacuum. Was it an alternate method of finding TDC? I think as far as determining if my timing pulley or marks were somehow altered, I've ruled that out using the probe in the piston method, and as I've indicated, if my car has been driving around with the choke half on due to some numbskull pre-tensioning the linkage, by tightening the cable in the wrong place, and then maybe carb adjustments being made around that error (something I've yet to find out) then it is no wonder my car isn't driving very well. I'll still get the bits for the giggle pin if I can, postage will probably cost more than the parts! Thanks for the reassurance though that the missing bits themselves should not influence running (I didn't know if there might be excessive float when engine vibration and throttle operation were taking place).
My day is going so far as per the norm - got back from taking my Volvo in, found two wage slips posted through my letterbox from a contract employment services company, with my perfect address and post code on and two separate foreign sounding gentlemen's names as the recipients - I don't like that at all. Tried phoning, couldn't get through. Now I keep getting a call from a female relative and we keep getting cut off. Oh well, The Marina rad will get put back one day....
My day is going so far as per the norm - got back from taking my Volvo in, found two wage slips posted through my letterbox from a contract employment services company, with my perfect address and post code on and two separate foreign sounding gentlemen's names as the recipients - I don't like that at all. Tried phoning, couldn't get through. Now I keep getting a call from a female relative and we keep getting cut off. Oh well, The Marina rad will get put back one day....
-
Morris McKinnon

- Posts: 2925
- Joined: Thu Jun 05, 2014 3:30 am
- Location: South Wales
Re: 'NNN' and the overheat saga
yes, I'll have to update mine too with some pics of the proper SU pump.. which the wider spacer is for.mickthefitter wrote: I'm going to update the entry on fuel pump spacers in the Technical section, now that I've swapped my spacer over, with some photos I took, of the Marina 1.8 and Mini spacer blocks.
-
morris_carl
- Posts: 106
- Joined: Mon Jan 13, 2014 12:00 pm
Re: 'NNN' and the overheat saga
I'll give you a update on mine suffering the same issue, I've took the head off and its totally clogged up with crud! Taken me a couple of hours to get it flowing clean, will update when its back together see if it cures mine, might be the way forward for you
Sent from my XT1032 using Tapatalk
-
jiversteve

- Posts: 1141
- Joined: Tue Jul 29, 2008 5:30 pm
- Location: Spain
Re: 'NNN' and the overheat saga
Referring to my earlier post, you can only clean or remove crud from what you can see. After 30+ years the crud could be anywhere hidden behind core plugs etc.
There are only a few gaskets that seal the water system, removing the head means the biggest one, with the most individual seals needs changing.
I stand by my thought that something stronger than Holts Rad Flush is needed, perhaps Calgon?
Good luck, but.....
There are only a few gaskets that seal the water system, removing the head means the biggest one, with the most individual seals needs changing.
I stand by my thought that something stronger than Holts Rad Flush is needed, perhaps Calgon?
Good luck, but.....
Not a Marina owner, built in 1985 from a 1974 1.8TC MOT failure.
See Marlin History.
http://www.5speedmarina.com
Type 9 gearbox, Vented front discs, Dolly Sprint axle with disc conversion.

Next project? Megajolt?
See Marlin History.
http://www.5speedmarina.com
Type 9 gearbox, Vented front discs, Dolly Sprint axle with disc conversion.
Next project? Megajolt?
-
JubileeNut

- FMM Supporter

- Posts: 5181
- Joined: Tue Jun 05, 2007 7:14 pm
- Location: Worthing, West Sussex, UK
Re: 'NNN' and the overheat saga
#When I stripped my engine down during restoration the engine block drain plug when removed, looked like there was no hole in the block.
Took me a long time to clear it all out. All my core plugs were removed and head cleaned.
I have no overheating issues, just fuel evaporation issues.
If a car has stood for a long time then the engine may well have blocked water ways.
Took me a long time to clear it all out. All my core plugs were removed and head cleaned.
I have no overheating issues, just fuel evaporation issues.
If a car has stood for a long time then the engine may well have blocked water ways.
" Pru, Its Kicking off "
1973 Morris Marina TC Jubilee
2013 BMW 328i M Sport F31
1973 Morris Marina TC Jubilee
2013 BMW 328i M Sport F31
Re: 'NNN' and the overheat saga
Coca Cola 
1974 Marina Tc Coupe - 1950CC
1982 Morris Ital HL Estate - 7600 miles from new
1992 Lada Niva Cossack - brilliant
2008 Ducati 1098R TB21 LE 200bhp/99lb/ft of a monster on two wheels. All from 1198cc
1998 Laverda 750 Formula-rare
1997 Ducati 916 Senna - Awesome
!974 Honda CD175-awaiting resto - now stripped
1982 Morris Ital HL Estate - 7600 miles from new
1992 Lada Niva Cossack - brilliant
2008 Ducati 1098R TB21 LE 200bhp/99lb/ft of a monster on two wheels. All from 1198cc
1998 Laverda 750 Formula-rare
1997 Ducati 916 Senna - Awesome
!974 Honda CD175-awaiting resto - now stripped
-
morris_carl
- Posts: 106
- Joined: Mon Jan 13, 2014 12:00 pm
Re: 'NNN' and the overheat saga
I used a metal rod and got around everything I could , will see how it goes when its back together
Sent from my XT1032 using Tapatalk
Sent from my XT1032 using Tapatalk
-
mickthefitter
- Posts: 1457
- Joined: Thu May 26, 2016 11:00 pm
Re: 'NNN' and the overheat saga
Now you are all scaring me....think happy thoughts....think happy thoughts....