1980 Marina 575 Van
Moderators: ClaytonSpeed, balmy
Re: Maybe its karma..
I had 10cwt van springs on the back of a Mk2 1300 estate as the standard springs were beginning to settle- set at the same height so the car didn`t look any different- even when loaded. Good solid ride too.
Re: Maybe its karma..
Ghastly weekend weather, so only small progress.
I managed to apply some thermal/sound proofing to the roof.
Kept some antifreeze handy...

It was a bit fiddly as the self-adhesive nature of the material made it difficult to slide into edges.
However - finally got more of it stuck to the roof than to me...

Am definitely going to "lose" the side windows in some fashion.
Either tint to hell, or cover over with more insulation material, or totally remove and bond a piece of panel steel into the entire side recess.
This would add to the strength as well as avoid any deformation that would result from any form of welding.
I have a friend restoring another 575 and he is planning this approach too - so will likely have several sets of panels cut.
Will seam seal the edges so nothing looks out of place.
Meantime - will continue to work on the mechanicals.
The fitting of the new rear axle will be first up - will also involve changing the propshaft, and - I suspect - the handbrake cable.
Speedo will be totally out of whack as a result, but only until I fit the Mk3 dashboard.
Which will also involve fitting a Mk3 wiring loom.
And will also involve fitting a Mk3 heater.
I would also like to run reversing lights - so I guess some extra wires to the rear will be necessary.
I am considering using a full width Mk3 bumper, and moving the numberplate onto the rear doors.
This would also allow a towbar, and the use of the integral lights in the bumper to act as the reversing lights.
A bit of trial fitting will be needed before I am satisfied it will work ok.
Having every single one of the parts needed is a huge plus.
My original 575 had Ital bits - including the front doors.
I really like the full door glass arrangement with the rearview mirrors mounted off the fillet where the quarterlight isn't.
I have stripped a pair of Mk3 car doors and am rebuilding them in this fashion.
Apart from any other considerations - such as never having opened a quarterlight anyway - I do like the unrestricted view of my external mirrors.!
Oh - and the quarterlights make a lot of wind noise. Have not found a way to stop that yet.
I always have intended - but never yet managed - to photo document every one of the changes I make from original.
Hopefully this will be the exception.
I feel rather excited in anticipation of what is about to befall this humble little van.
Add 20 parts BEAST..!
Lol.
Stay tuned.
I managed to apply some thermal/sound proofing to the roof.
Kept some antifreeze handy...
It was a bit fiddly as the self-adhesive nature of the material made it difficult to slide into edges.
However - finally got more of it stuck to the roof than to me...
Am definitely going to "lose" the side windows in some fashion.
Either tint to hell, or cover over with more insulation material, or totally remove and bond a piece of panel steel into the entire side recess.
This would add to the strength as well as avoid any deformation that would result from any form of welding.
I have a friend restoring another 575 and he is planning this approach too - so will likely have several sets of panels cut.
Will seam seal the edges so nothing looks out of place.
Meantime - will continue to work on the mechanicals.
The fitting of the new rear axle will be first up - will also involve changing the propshaft, and - I suspect - the handbrake cable.
Speedo will be totally out of whack as a result, but only until I fit the Mk3 dashboard.
Which will also involve fitting a Mk3 wiring loom.
And will also involve fitting a Mk3 heater.
I would also like to run reversing lights - so I guess some extra wires to the rear will be necessary.
I am considering using a full width Mk3 bumper, and moving the numberplate onto the rear doors.
This would also allow a towbar, and the use of the integral lights in the bumper to act as the reversing lights.
A bit of trial fitting will be needed before I am satisfied it will work ok.
Having every single one of the parts needed is a huge plus.
My original 575 had Ital bits - including the front doors.
I really like the full door glass arrangement with the rearview mirrors mounted off the fillet where the quarterlight isn't.
I have stripped a pair of Mk3 car doors and am rebuilding them in this fashion.
Apart from any other considerations - such as never having opened a quarterlight anyway - I do like the unrestricted view of my external mirrors.!
Oh - and the quarterlights make a lot of wind noise. Have not found a way to stop that yet.
I always have intended - but never yet managed - to photo document every one of the changes I make from original.
Hopefully this will be the exception.
I feel rather excited in anticipation of what is about to befall this humble little van.
Add 20 parts BEAST..!
Lol.
Stay tuned.
-
JubileeNut

- FMM Supporter

- Posts: 5221
- Joined: Tue Jun 05, 2007 7:14 pm
- Location: Worthing, West Sussex, UK
Re: Maybe its karma..
Quarter light noise, tell me about! Mine are never quiet and spend all the time open to stop the whistle even in the rain! 
" Pru, Its Kicking off "
1973 Morris Marina TC Jubilee
2013 BMW 328i M Sport F31
1973 Morris Marina TC Jubilee
2013 BMW 328i M Sport F31
Re: Maybe its karma..
Yay.
A fine weekend with few commitments.
Just the right time to move one's projects along a tad.
Yanked all manner or rear wheel drive bits out from under the 575.

Discovered in the process that an annoying thunk in the rear suspension is due to one of the tubes which run through the chassis rail and mount the spring shackles having come loose.
It will require welding - but for now I shall press on as this vehicle is needed later in the week.
I can get it welded later by dropping the rear end of the spring on that side.
One thing that was very apparent - was the difference in weight of the old and new components.
The original axle assembly is much heavier than a saloon type - mostly due to the massive brake drums on the van unit.
However - the commercial 4-leaf springs are also much heavier than the estate type 4-leaf going back in.

This will reduce the unsprung weight enough to improve ride quality somewhat I feel.
The entire swap entails the use of all the following parts..

The 3.6 axle housing itself
The lighter duty rear springs
A handbrake cable to suit the saloon axle
A longer propshaft to match the shorter diff head - I will make one from the original front half and a donor rear half
Various rubber bushes and plates which make the saloon rear end slightly more isolated from road vibrations than the completely solid mount van type.
The brake line simply joins up to either type axle.
I have a set of polyurethane bushes for the top shackle mounts - an improvement over the original squishy type.
The bushes in my lowered 4-leaf springs are in excellent shape.
Now I shall bash it all back together.
Given time....
A fine weekend with few commitments.
Just the right time to move one's projects along a tad.
Yanked all manner or rear wheel drive bits out from under the 575.
Discovered in the process that an annoying thunk in the rear suspension is due to one of the tubes which run through the chassis rail and mount the spring shackles having come loose.
It will require welding - but for now I shall press on as this vehicle is needed later in the week.
I can get it welded later by dropping the rear end of the spring on that side.
One thing that was very apparent - was the difference in weight of the old and new components.
The original axle assembly is much heavier than a saloon type - mostly due to the massive brake drums on the van unit.
However - the commercial 4-leaf springs are also much heavier than the estate type 4-leaf going back in.
This will reduce the unsprung weight enough to improve ride quality somewhat I feel.
The entire swap entails the use of all the following parts..
The 3.6 axle housing itself
The lighter duty rear springs
A handbrake cable to suit the saloon axle
A longer propshaft to match the shorter diff head - I will make one from the original front half and a donor rear half
Various rubber bushes and plates which make the saloon rear end slightly more isolated from road vibrations than the completely solid mount van type.
The brake line simply joins up to either type axle.
I have a set of polyurethane bushes for the top shackle mounts - an improvement over the original squishy type.
The bushes in my lowered 4-leaf springs are in excellent shape.
Now I shall bash it all back together.
Given time....
-
MarinaCoupe

- Posts: 10257
- Joined: Thu May 31, 2007 5:26 pm
- Location: Bedford
- Contact:
Re: Maybe its karma..
Kilroy - How about white Perspex to match the bodywork, cut to fit the existing rubbers. Then insulate and board over on the inside?Am definitely going to "lose" the side windows in some fashion.
Either tint to hell, or cover over with more insulation material, or totally remove and bond a piece of panel steel into the entire side recess.
This would add to the strength as well as avoid any deformation that would result from any form of welding.
I have a friend restoring another 575 and he is planning this approach too - so will likely have several sets of panels cut.
Will seam seal the edges so nothing looks out of place.
Stay tuned.
Chris
Re: Maybe its karma..
I feel that the window rubbers have been the undoing of many a Marina.
The side windows in the vans were fitted over here, and little attention given to the quality of the job.
Removing them completely is the best chance of a lifetime repair - as long as the bonding process is thorough.
Mind you - the same process does allow for all surfaces to be adequately prepared first.
Re: Maybe its karma..
If you are 'mix and matching' propshafts, get it balanced before fitting. Otherwise, just use a saloon one...
The classic car movement needs Jeremy Clarkson like Jenson Button needs a towhitch and a Sprite Musketeer....
Re: Maybe its karma..
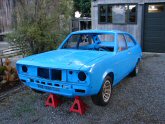
Got the axle assembly bolted in today.
Handbrake cable all connected and working to my satisfaction.

Replaced a failed universal in the donor propshaft and used the complete assembly.
I have built several propshafts from differing halves before and not had any balance issues - but thought I might get away with this one without having to bother.

All together - bled the brakes - we have progress.
This is the result...

Next step is to rebuild the front suspension - change the front hubs to saloon type - and fit an antiswaybar.
I guess I will address the ride height at the same time..
It sounds as if the centre bearing in the propshaft is too far gone - so back to the original plan to use half of each.
Moving right along.
Handbrake cable all connected and working to my satisfaction.
Replaced a failed universal in the donor propshaft and used the complete assembly.
I have built several propshafts from differing halves before and not had any balance issues - but thought I might get away with this one without having to bother.
All together - bled the brakes - we have progress.
This is the result...
Next step is to rebuild the front suspension - change the front hubs to saloon type - and fit an antiswaybar.
I guess I will address the ride height at the same time..
It sounds as if the centre bearing in the propshaft is too far gone - so back to the original plan to use half of each.
Moving right along.
Re: Maybe its karma..
One step forward - two steps back...
During the recovery trip I had noticed that the inside of the rocker cover was sporting a bit of white frothy.
This generally signifies a leaking head gasket.
A bit of local running and obvious pressurising of the header tank confirmed this.
I ran it with the cap undone for a bit and just kept topping up the water.
At some point I forgot and tightened the cap - whereupon the van began starting on about 2 cylinders.
I took the spark plugs out one morning and then cranked the engine over.
Various gouts of water issued forth from No.2 spark plug hole.
Dang. Can't leave that any longer.
Whipped the head off and cleaned everything up. Some signs of leakage between water jacket holes and No.2 cylinder.
The head looks as though it has had recent work - but there are many signs that recent work has been performed by fruit bats.
I fitted a new gasket and tightened it all down - then left it overnight and repeated the process.
After the second coming, I adjusted the valve clearances. Considering it was exactly the same sort of gasket - the clearances were colossal.
I checked one valve and found that the required 12 thou gap equalled one quarter turn of the adjuster.
There after I just wound each adjuster down by finger until it touched the valve - then backed off a quarter turn and locked it.
Job done.
Started it up and it was stupendously quieter than it had ever been.
It used to sound like a diesel.
I realise now that the noise had been emanating from the side of the block where the cam followers are. They obviously did not enjoy being super loose.!
I suspect that some previous owner has had head work done - but nobody has retightened the head - so it has just begun to force combustion pressure past the gasket.
It now holds water properly and is running very well - I have even been surprised how much grunt is on tap from a mere 1300.

I totally stripped out the front suspension. Every single bit of it.
Various bits were in dire straits as one might expect of a high mileage commercial vehicle.
Some bits were unusable, there was a snapped off bolt which located a torsion bar, and a totally U/S trunnion - all were replaced and restored.
I lowered the torsion bars by the usual amount that results in a 2" lower stance.
Unfortunately, I had neither figured on;
a. The lighter weight of the 1300 engine and..
b. The heavier 21mm torsion bars (cars and estates are 19mm..)
So - the thing remained at very much the same height as stock at the front - whereas I had lowered the rear by a rude word amount.
As I do not wish to rebuild the front suspension a second time, I swapped the rear lowered springs for a pair of stock height 2-leaf car springs.
Once I fit the larger engine the front will settle to the required height, and I will then do whatever is necessary to make the rear match.
The softer springs give a much more compliant ride - I would have to say - this is the smoothest riding Marina van I have ever experienced.!
I fitted a set of widened Triumph Spitfire steels in honour of the occasion...

I am enjoying the raised gearing greatly - this thing now gets off its bum and behaves like a capable beastie.
Can't believe how useful it is - I find a need for it every other day.
It looks a bit more meaningful in its present guise than it did in one of the earlier pics when it had just taken residence..

Next manoeuvres will be to continue soundproofing the rear and the replacing of the slightly deformed and leaky rear doors.
I shall panelbeat the rear wheel tubs and apply some vinyl covering liberated from one of my terminal estates.
Progress on the ex-race car engine continues as I track down and fit the missing bits, plus those fineries that are necessary in a legal road vehicle - like speedos and stuff...
Loving this trip and looking forward to working in the dry for a change as our summer approaches.
Go well Dudes.
During the recovery trip I had noticed that the inside of the rocker cover was sporting a bit of white frothy.
This generally signifies a leaking head gasket.
A bit of local running and obvious pressurising of the header tank confirmed this.
I ran it with the cap undone for a bit and just kept topping up the water.
At some point I forgot and tightened the cap - whereupon the van began starting on about 2 cylinders.
I took the spark plugs out one morning and then cranked the engine over.
Various gouts of water issued forth from No.2 spark plug hole.
Dang. Can't leave that any longer.
Whipped the head off and cleaned everything up. Some signs of leakage between water jacket holes and No.2 cylinder.
The head looks as though it has had recent work - but there are many signs that recent work has been performed by fruit bats.
I fitted a new gasket and tightened it all down - then left it overnight and repeated the process.
After the second coming, I adjusted the valve clearances. Considering it was exactly the same sort of gasket - the clearances were colossal.
I checked one valve and found that the required 12 thou gap equalled one quarter turn of the adjuster.
There after I just wound each adjuster down by finger until it touched the valve - then backed off a quarter turn and locked it.
Job done.
Started it up and it was stupendously quieter than it had ever been.
It used to sound like a diesel.
I realise now that the noise had been emanating from the side of the block where the cam followers are. They obviously did not enjoy being super loose.!
I suspect that some previous owner has had head work done - but nobody has retightened the head - so it has just begun to force combustion pressure past the gasket.
It now holds water properly and is running very well - I have even been surprised how much grunt is on tap from a mere 1300.
I totally stripped out the front suspension. Every single bit of it.
Various bits were in dire straits as one might expect of a high mileage commercial vehicle.
Some bits were unusable, there was a snapped off bolt which located a torsion bar, and a totally U/S trunnion - all were replaced and restored.
I lowered the torsion bars by the usual amount that results in a 2" lower stance.
Unfortunately, I had neither figured on;
a. The lighter weight of the 1300 engine and..
b. The heavier 21mm torsion bars (cars and estates are 19mm..)
So - the thing remained at very much the same height as stock at the front - whereas I had lowered the rear by a rude word amount.
As I do not wish to rebuild the front suspension a second time, I swapped the rear lowered springs for a pair of stock height 2-leaf car springs.
Once I fit the larger engine the front will settle to the required height, and I will then do whatever is necessary to make the rear match.
The softer springs give a much more compliant ride - I would have to say - this is the smoothest riding Marina van I have ever experienced.!
I fitted a set of widened Triumph Spitfire steels in honour of the occasion...
I am enjoying the raised gearing greatly - this thing now gets off its bum and behaves like a capable beastie.
Can't believe how useful it is - I find a need for it every other day.
It looks a bit more meaningful in its present guise than it did in one of the earlier pics when it had just taken residence..
Next manoeuvres will be to continue soundproofing the rear and the replacing of the slightly deformed and leaky rear doors.
I shall panelbeat the rear wheel tubs and apply some vinyl covering liberated from one of my terminal estates.
Progress on the ex-race car engine continues as I track down and fit the missing bits, plus those fineries that are necessary in a legal road vehicle - like speedos and stuff...
Loving this trip and looking forward to working in the dry for a change as our summer approaches.
Go well Dudes.
Re: Maybe its karma..
I contacted the previous owner of the van to find out where they sourced the new windscreen rubber - a thing I have never been able to find over here.
He responded and gave me some extra info about the engine.
Apparently - it had a rather major rebuild prior to his ownership - but always smoked, and it was thought that the use of synthetic oil had prevented the rings bedding in properly.
I doubt it.
I would think it more likely that nobody has given it enough work to do the job.
I certainly had not - I thought it was on its last legs and was nursing it along.
The hell with that then.!
I have been giving it a lot of revs since this discovery - which led to the discovery that the timing was somewhat retarded.
I removed the distributor and found the locating bracket was very much out of shape so the dizzie was not even fitting up properly.
Took care of that today and am trying to get the timing right.
There do not seem to be any timing marks on the crank pulley to use a timing light with - so I am using the suck-it-and-see method instead.
Currently feel I have it just a tad too advanced - but we are running pretty well - and I have not seen any smoke for a few days.
So - it was time to indulge myself a little with some aesthetics.
I fitted a pair of brand new external mirrors...

Then I fitted a Mk3 chin spoiler...

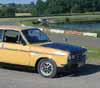
And finally applied a bit of matt black behind the grille - and to the grille itself - having removed the peeling AA badge.

Current thinking is that I will fit a grille with integral driving lights - much as the red estate has in the background.
Those Cibies make night driving a much less harrowing affair - and this van will be used for some serious adventure tours I hope.
This will entail fitting the front wiring loom from a Mk3 saloon - and I have one I prepared earlier.
A few additional relays will help to provide some more realistic volts to aid the illumination process.
I am feeling the love.
I am also bolting all sorts of bits to the uber-motor in order to find out what I am still missing and thus secure it before the changeover.
It is shaping up fairly well...

So that's the state of play.
Vans are good for you.
He responded and gave me some extra info about the engine.
Apparently - it had a rather major rebuild prior to his ownership - but always smoked, and it was thought that the use of synthetic oil had prevented the rings bedding in properly.
I doubt it.
I would think it more likely that nobody has given it enough work to do the job.
I certainly had not - I thought it was on its last legs and was nursing it along.
The hell with that then.!
I have been giving it a lot of revs since this discovery - which led to the discovery that the timing was somewhat retarded.
I removed the distributor and found the locating bracket was very much out of shape so the dizzie was not even fitting up properly.
Took care of that today and am trying to get the timing right.
There do not seem to be any timing marks on the crank pulley to use a timing light with - so I am using the suck-it-and-see method instead.
Currently feel I have it just a tad too advanced - but we are running pretty well - and I have not seen any smoke for a few days.
So - it was time to indulge myself a little with some aesthetics.
I fitted a pair of brand new external mirrors...
Then I fitted a Mk3 chin spoiler...
And finally applied a bit of matt black behind the grille - and to the grille itself - having removed the peeling AA badge.
Current thinking is that I will fit a grille with integral driving lights - much as the red estate has in the background.
Those Cibies make night driving a much less harrowing affair - and this van will be used for some serious adventure tours I hope.
This will entail fitting the front wiring loom from a Mk3 saloon - and I have one I prepared earlier.
A few additional relays will help to provide some more realistic volts to aid the illumination process.
I am feeling the love.
I am also bolting all sorts of bits to the uber-motor in order to find out what I am still missing and thus secure it before the changeover.
It is shaping up fairly well...
So that's the state of play.
Vans are good for you.
-
MarinaCoupe
- Posts: 10257
- Joined: Thu May 31, 2007 5:26 pm
- Location: Bedford
- Contact:
Re: Maybe its karma..
Sure are Kilroy, keep on going mate.
Sent from my iPhone using Tapatalk
Sent from my iPhone using Tapatalk

Re: Maybe its karma..
That's shaping up nicely Kilroy.
Matt
1974 1973 Tundra Black Tulip 1800 SDL TC Estate "Mud"- slowly slowly coming together.
1972 White 1800 DL Saloon- Better than it looks, but it looks awful...
1974 1973 Tundra Black Tulip 1800 SDL TC Estate "Mud"- slowly slowly coming together.
1972 White 1800 DL Saloon- Better than it looks, but it looks awful...

Re: Maybe its karma..
This has been a great story. Keep it up!
-
locost_bryan

- Posts: 3096
- Joined: Fri May 22, 2009 2:43 am
- Location: Auckland, New Zealand
Re: Maybe its karma..
Should be a nice wee unit for adventuring, once you've fitted the more civilised dash and grill from one of your tired cars. 
You'll need heavy duty clamps on the kayak rack once you've fitted that race motor.
About time we had another one of your travelogues.
You'll need heavy duty clamps on the kayak rack once you've fitted that race motor.
About time we had another one of your travelogues.
Bryan
Auckland NZ
1972 Morris Marina 1750 TC Coupe "Ozzy"
Auckland NZ
1972 Morris Marina 1750 TC Coupe "Ozzy"